The Complete Guide To Install And Secure phpMyAdmin On Ubuntu 20.04 LTS
It provides the steps required to install and secure phpMyAdmin on Ubuntu 20.04 LTS.
MySQL is among the popular relational database systems used as data storage of websites and web applications. We can communicate with the MySQL server over the command line or terminal using the client software provided by it. It might not be easy to perform the regular operations on the MySQL server over the command line. Also, the GUI based software i.e. MySQL Workbench is available, but it's available only as a Desktop application. phpMyAdmin is among the popular web-based interfaces to communicate with the MySQL database server. Also, phpMyAdmin is a free and open-source database management tool written in PHP. This tutorial provides the steps required to install and secure phpMyAdmin on Ubuntu 20.04 LTS. The steps provided in this guide are specific for the Apache Web Server. The steps should be the same for other versions of Ubuntu and Linux systems.
This guide provides the steps to install phpMyAdmin using the APT Package Manager and source code. It also shows how to configure phpMyAdmin as Sub-Directory and Sub-Domain using the Apache Web Server.
Prerequisites
This tutorial assumes that you have already installed Ubuntu 20.04 LTS desktop or server version either for local or production usage. You can follow Install Ubuntu 20.04 LTS Desktop, Install Ubuntu 20.04 LTS On Windows Using VMware, and Spin Up Ubuntu 20.04 LTS Server On Amazon EC2 to install Ubuntu 20.04 LTS. It also assumes that you have either root privileges or a regular user with sudo privileges.
It also assumes that the MySQL, PHP, and Apache Web Server are already installed. You may follow How To Install MySQL 8 on Ubuntu 20.04 LTS, How To Install PHP 7 On Ubuntu 20.04 LTS, How To Install Apache 2 On Ubuntu 20.04 LTS, Configure Virtual Host On Apache and How To Install Let's Encrypt For Apache On Ubuntu.
In the case of production usage, it assumes that you have access to the remote server. It also assumes that you have a valid domain name configured to install the SSL certificate if not done yet. We must install the SSL certification for production usage to secure the phpMyAdmin installation since it communicates with the MySQL database server to perform the database operations.
Install phpMyAdmin Using APT
This section provides the steps to install phpMyAdmin using the APT Package Manager. We can install the phpMyAdmin available at the Ubuntu 20.04 LTS repositories by following this section. Now, execute the below-mentioned commands to start installing phpMyAdmin.
# Refresh the packages index
sudo apt-get update

# Install phpMyAdmin using APT
sudo apt install phpmyadmin php-mbstring php-gd php-zip php-json
The above-mentioned commands will start installing phpMyAdmin. Also, the installation script asks several questions to complete the installation. It will ask to choose the type of web server as shown in Fig 1.

Fig 1
Keep the option apach2 selected and press the Enter Key. The next screen asks to create the database of phpMyAdmin for its internal processing. We can simply skip it to complete the installation. In case you have opted to create the database of phpMyAdmin as shown in Fig 2, press Enter Key to proceed further.

Fig 2
The next screens ask to enter Password and Confirm Password as shown in Fig 3 and Fig 4.

Fig 3

Fig 4
If you have configured your MySQL database server to use the Validate Password Plugin, it shows the password error as shown in Fig 5.
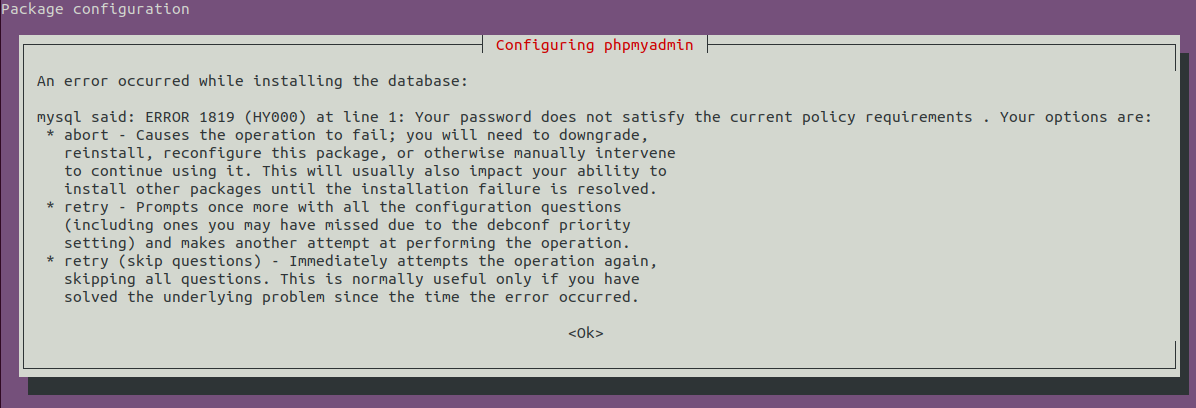
Fig 5
There seems some internal issue with phpMyAdmin since it didn't work for me even after trying multiple times with different passwords. Still, you may try at least once by pressing the Enter Key. It will provide the option to retry as shown in Fig 13. Now, keep the option retry selected and press Right Arrow Key and Enter Key. It will ask to choose the connection type, host, port, password algorithm, database name, and database username as shown in Fig 6, Fig 7, Fig 8, Fig 9, Fig 10, Fig 11, and Fig 12.

Fig 6

Fig 7

Fig 8

Fig 9

Fig 10

Fig 11

Fig 12
The next screens ask to enter Password and Confirm Password as shown in Fig 3 and Fig 4. In case it still fails and shows Fig 5, you may skip setting the password of the phpMyAdmin database as shown in Fig 13.
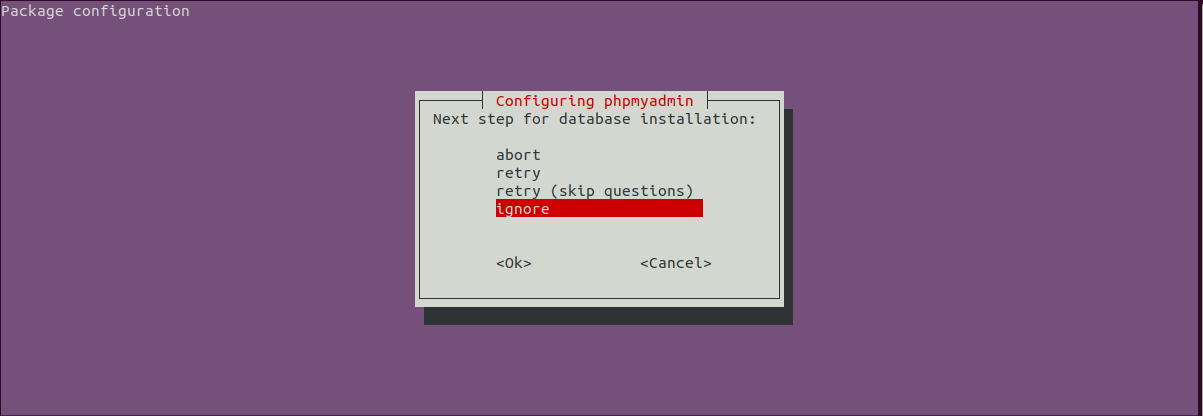
Fig 13
You may completely abort installing the phpMyAdmin by selecting the abort option else to skip creating the phpMyAdmin database by choosing the ignore option as shown in Fig 13. After ignoring the password, the installation of phpMyAdmin completes and shows the success message as shown below.
# phpMyAdmin Installation
----
----
checking privileges on database phpmyadmin for phpmyadmin@localhost: user creation needed.
granting access to database phpmyadmin for phpmyadmin@localhost: failed.
error encountered creating user:
mysql said: ERROR 1819 (HY000) at line 1: Your password does not satisfy the current policy requirements
dbconfig-common: phpmyadmin configure: trying again.
Determining localhost credentials from /etc/mysql/debian.cnf: succeeded.
dbconfig-common: writing config to /etc/dbconfig-common/phpmyadmin.conf
Replacing config file /etc/dbconfig-common/phpmyadmin.conf with new version
Replacing config file /etc/phpmyadmin/config-db.php with new version
checking privileges on database phpmyadmin for phpmyadmin@localhost: user creation needed.
granting access to database phpmyadmin for phpmyadmin@localhost: failed.
error encountered creating user:
mysql said: ERROR 1819 (HY000) at line 1: Your password does not satisfy the current policy requirements
dbconfig-common: phpmyadmin configure: ignoring errors from here forwards
populating database via sql...  done.
dbconfig-common: flushing administrative password
dbconfig-common: phpmyadmin configure: ignoring errors from here forwards
Setting up php-gd (2:7.4+75) ...
Processing triggers for libc-bin (2.31-0ubuntu9) ...
Processing triggers for man-db (2.9.1-1) ...
Processing triggers for libapache2-mod-php7.4 (7.4.3-4ubuntu2.2) ...
Processing triggers for php7.4-cli (7.4.3-4ubuntu2.2) ...
The password failure step skips creating the database of phpMyAdmin but completes the installation.
In case you have selected the abort option as shown in Fig 13, we have to disable the Validate Password Plugin of MySQL to install phpMyAdmin with its storage database. Also, in case you have accidentally installed phpMyAdmin by selecting the option to ignore, but want the phpmyadmin database, you can completely remove it as shown in the next section and again start the installation process.
Now, we will disable the Validate Password Plugin and again install phpMyAdmin with the database as shown below.
# Login to MySQL

sudo mysql
# OR
mysql -u root -p

# Disabled Validate Password Plugin
mysql> UNINSTALL COMPONENT "file://component_validate_password";
mysql> exit;
Now install phpMyAdmin using the command as shown below.
# Install phpMyAdmin
sudo apt install phpmyadmin
It will ask for the Password and Confirm Password as shown in Fig 3 and Fig 4. After providing the appropriate password, it will ask to choose the Web Server as shown in Fig 1. It simply completes the installation without showing any error or further questions. The installation output should be similar as shown below.
# Install phpMyAdmin
----
----
Determining localhost credentials from /etc/mysql/debian.cnf: succeeded.
Selecting previously unselected package phpmyadmin.
(Reading database ... 156943 files and directories currently installed.)
Preparing to unpack .../phpmyadmin_4%3a4.9.5+dfsg1-2_all.deb ...
Unpacking phpmyadmin (4:4.9.5+dfsg1-2) ...
Setting up phpmyadmin (4:4.9.5+dfsg1-2) ...
Determining localhost credentials from /etc/mysql/debian.cnf: succeeded.
dbconfig-common: writing config to /etc/dbconfig-common/phpmyadmin.conf

Creating config file /etc/dbconfig-common/phpmyadmin.conf with new version

Creating config file /etc/phpmyadmin/config-db.php with new version
checking privileges on database phpmyadmin for phpmyadmin@localhost: user creation needed.
granting access to database phpmyadmin for phpmyadmin@localhost: success.
verifying access for phpmyadmin@localhost: success.
creating database phpmyadmin: success.
verifying database phpmyadmin exists: success.
populating database via sql...  done.
dbconfig-common: flushing administrative password
This creates the database of phpMyAdmin and also completes the installation. We can use phpMyAdmin with and without its database. Now again enable the Validate Password Plugin as shown below.
# Login to MySQL

sudo mysql
# OR
mysql -u root -p

# Enable Validate Password Plugin
mysql> INSTALL COMPONENT "file://component_validate_password";
mysql> exit;
The above-mentioned commands enable phpMyAdmin as sub-domain to the primary domain using the alias phpmyadmin. We can access the same on the browser using the URLs as shown below.
Localhost - http://localhost/phpmyadmin OR http://127.0.0.1/phpmyadmin
Remote/Production Server - http://www.myserverdomain.com/phpmyadmin OR http://xx.xx.xxx.xxx/phpmyadmin - Replace www.myserverdomain.com with your server's domain address or xx.xx.xxx.xxx with your server's IP address.
We can disable the phpMyAdmin by executing the command as shown below.
# Disable phpMyAdmin
sudo unlink /etc/apache2/conf-enabled/phpmyadmin.conf

# Reload Apache
sudo systemctl reload apache2
Production Server - On the production server, we can also install phpMyAdmin as a sub-domain. Disable the phpMyAdmin configured as sub-directory as shown above. Now create and enable the virtual host for phpMyAdmin as shown below.
# Disable phpMyAdmin sub-directory configuration
sudo unlink /etc/apache2/conf-enabled/phpmyadmin.conf

# Create phpMyAdmin virtual host
sudo nano /etc/apache2/sites-available/db.myserverdomain.com.conf

# Content - phpMyAdmin virtual host
<VirtualHost *:80>
	ServerName mydb.myserverdomain.com
	ServerAlias mydb.myserverdomain.com
	ServerAdmin admin@myserverdomain.com

	DocumentRoot /usr/share/phpmyadmin
	<Directory /usr/share/phpmyadmin>
		Options SymLinksIfOwnerMatch
		DirectoryIndex index.php
		AllowOverride All

		# limit libapache2-mod-php to files and directories necessary by pma
		<IfModule mod_php7.c>
			php_admin_value upload_tmp_dir /var/lib/phpmyadmin/tmp
			php_admin_value open_basedir /usr/share/phpmyadmin/:/etc/phpmyadmin/:/var/lib/phpmyadmin/:/usr/share/php/php-gettext/:/usr/share/php/php>
		</IfModule>
	</Directory>

	# Disallow web access to directories that don't need it
	<Directory /usr/share/phpmyadmin/templates>
		Require all denied
	</Directory>
	<Directory /usr/share/phpmyadmin/libraries>
		Require all denied
	</Directory>
</VirtualHost>

# Save and exit the editor

# Enable virtual host
sudo a2ensite mydb.myserverdomain.com

# Reload Apache
sudo systemctl reload apache2
This completes the configuration of phpMyAdmin as a sub-domain. Now we can access it using the URL http://mydb.myserverdomain.com.
The default page of phpMyAdmin should be similar to Fig 14 for both types of installations i.e. sub-directory or sub-domain.
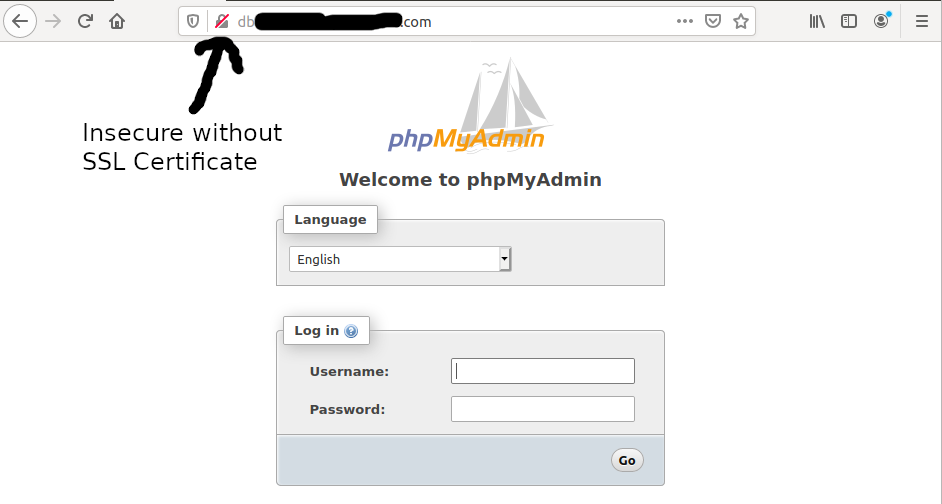
Fig 14
Uninstall phpMyAdmin
We can completely remove phpMyAdmin by uninstalling it with the purge option as shown below. It will completely uninstall phpMyAdmin and also remove all the configuration files associated with it.
# Uninstall or Remove phpMyAdmin
sudo apt-get purge phpmyadmin
It will also ask for confirmation to remove the phpMyAdmin database as shown in Fig 15. You may choose to remove it in case it was created while installing phpMyAdmin.

Fig 15
After completing the uninstallation of phpMyAdmin, the output should be similar as shown below.
# Uninstall or Remove phpMyAdmin
----
----
(Reading database ... 158668 files and directories currently installed.)
Removing phpmyadmin (4:4.9.5+dfsg1-2) ...
Determining localhost credentials from /etc/mysql/debian.cnf: succeeded.
(Reading database ... 156952 files and directories currently installed.)
Purging configuration files for phpmyadmin (4:4.9.5+dfsg1-2) ...
Also, auto-remove the additional libraries that get installed while installing phpMyAdmin as shown below.
# Auto Clean
sudo apt-get autoclean

# Auto Remove
sudo apt autoremove
# OR
# Auto Remove with purge - It will also remove all the configurations
sudo apt-get --purge autoremove
Download Source Code And Install phpMyAdmin
This section explains the steps to install phpMyAdmin using the source code. We can always install the most recent version of phpMyAdmin by following this approach. Open the official Download Page of phpMyAdmin showing the download options as shown below.
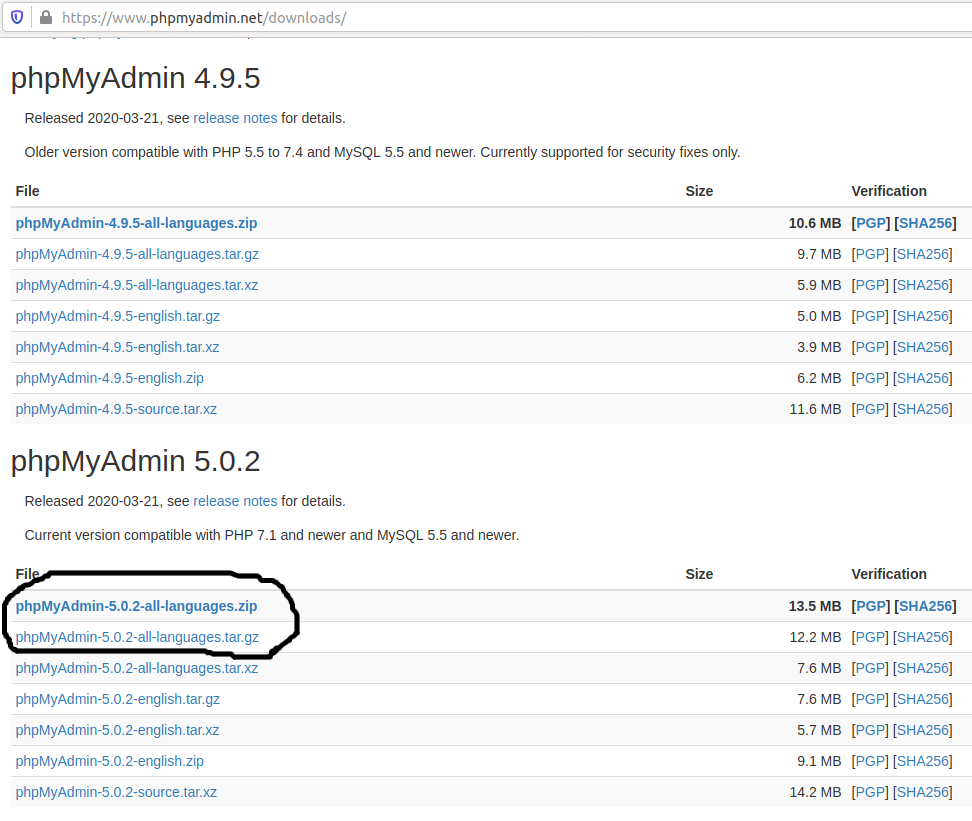
Fig 16
Right-click and copy the download link of your preferred choice and download it as shown below.
# Install Packages
sudo apt install zip unzip php-mbstring php-gd php-zip php-json

# Download phpMyAdmin
sudo wget https://files.phpmyadmin.net/phpMyAdmin/5.0.2/phpMyAdmin-5.0.2-all-languages.zip
# OR
sudo wget https://files.phpmyadmin.net/phpMyAdmin/5.0.2/phpMyAdmin-5.0.2-all-languages.tar.gz
Now install phpMyAdmin as shown below.
# Extract phpMyAdmin
sudo unzip phpMyAdmin-5.0.2-all-languages.zip
# OR
sudo tar xvf phpMyAdmin-5.0.2-all-languages.tar.gz

# Deploy phpMyAdmin
sudo mv phpMyAdmin-5.0.2-all-languages /usr/share/phpmyadmin

# Create tmp directory
sudo mkdir -p /var/lib/phpmyadmin/tmp

# Change ownership
sudo chown -R www-data:www-data /var/lib/phpmyadmin
Now we will configure phpMyAdmin as shown below.
# Copy the configuration file
sudo cp /usr/share/phpmyadmin/config.sample.inc.php /usr/share/phpmyadmin/config.inc.php
# Update the configuration file
sudo nano /usr/share/phpmyadmin/config.inc.php
# Update
------
$cfg['blowfish_secret'] = 'THISIS32CHARACTERSLONGLONGSTRING'; // Any string of 32 characters
------$cfg['TempDir'] = '/var/lib/phpmyadmin/tmp'; // Add at the last
# Save and exit the editor - Ctrl + o -> Enter -> Ctrl + x
Notes: If blowfish_secret is not set, phpMyAdmin throws the error - The configuration file now needs a secret passphrase (blowfish_secret).
You may also disallow root login by adding the additional configuration at the last as shown below.
$cfg['Servers'][$i]['AllowRoot'] = false;
This completes the installation of phpMyAdmin. Now create the configuration to access it as either sub-directory or virtual host to access it as sub-domain as shown below.
Sub-Directory
Create the Apache configuration and enable it as shown below.
# Create the Configuration
sudo nano /etc/apache2/conf-available/phpmyadmin.conf

# Configuration content
Alias /mydb /usr/share/phpmyadmin

<Directory /usr/share/phpmyadmin>
        Options SymLinksIfOwnerMatch
        DirectoryIndex index.php
        AllowOverride All

        <IfModule mod_php7.c>
                php_admin_value upload_tmp_dir /var/lib/phpmyadmin/tmp
                php_admin_value open_basedir /usr/share/phpmyadmin/:/etc/phpmyadmin/:/var/lib/phpmyadmin/:/usr/share/php/php-gettext/:/usr/share>
        </IfModule>

</Directory>

# Disallow web access to directories that don't need it
<Directory /usr/share/phpmyadmin/templates>
    Require all denied
</Directory>
<Directory /usr/share/phpmyadmin/libraries>
    Require all denied
</Directory>

# Save and exit the editor

# Enable PHP module mbstring
sudo phpenmod mbstring

# Enable configuration
sudo a2enconf phpmyadmin

# Restart Apache
sudo systemctl restart apache2
The above-mentioned commands enable phpMyAdmin as a sub-domain to the primary domain using the alias mydb. It can be accessed as shown below.
Localhost - http://localhost/mydb OR http://127.0.0.1/mydb
Remote/Production Server - http://www.myserverdomain.com/mydb OR http://xx.xx.xxx.xxx/mydb - Replace www.myserverdomain.com with your server's domain address or xx.xx.xxx.xxx with your server's IP address.
We can disable the phpMyAdmin by executing the command as shown below.
# Disable phpMyAdmin
sudo a2disconf phpmyadmin

# Reload Apache
sudo systemctl reload apache2
Sub-Domain
We can also install phpMyAdmin as a sub-domain. Disable the phpMyAdmin configured as sub-directory as shown above. Now create and enable the virtual host for phpMyAdmin as shown below.
# Disable phpMyAdmin sub-directory configuration
sudo a2disconf phpmyadmin

# Create phpMyAdmin virtual host
sudo nano /etc/apache2/sites-available/db.myserverdomain.com.conf

# Content - phpMyAdmin virtual host
<VirtualHost *:80>
	ServerName mydb.myserverdomain.com
	ServerAlias mydb.myserverdomain.com
	ServerAdmin admin@myserverdomain.com

	DocumentRoot /usr/share/phpmyadmin
	<Directory /usr/share/phpmyadmin>
		Options SymLinksIfOwnerMatch
		DirectoryIndex index.php
		AllowOverride All

		# limit libapache2-mod-php to files and directories necessary by pma
		<IfModule mod_php7.c>
			php_admin_value upload_tmp_dir /var/lib/phpmyadmin/tmp
			php_admin_value open_basedir /usr/share/phpmyadmin/:/etc/phpmyadmin/:/var/lib/phpmyadmin/:/usr/share/php/php-gettext/:/usr/share/php/php>
		</IfModule>
	</Directory>

	# Disallow web access to directories that don't need it
	<Directory /usr/share/phpmyadmin/templates>
		Require all denied
	</Directory>
	<Directory /usr/share/phpmyadmin/libraries>
		Require all denied
	</Directory>
</VirtualHost>

# Save and exit the editor

# Enable virtual host
sudo a2ensite mydb.myserverdomain.com

# Reload Apache
sudo systemctl reload apache2
We can access phpMyAdmin as a sub-domain using the URL http://mydb.myserverdomain.com. The default page of phpMyAdmin should be similar to Fig 14 for both types of installations i.e. sub-directory or sub-domain.
Storage Database
In the previous section, while installing phpMyAdmin using the APT Package Manager, we have discussed installing the phpmyadmin database. Since we have manually installed phpMyAdmin, we can manually create the same database if required.
# Update the configuration file
sudo nano /usr/share/phpmyadmin/config.inc.php

# Update
------
$cfg['Servers'][$i]['controluser'] = 'phpmyadmin';
$cfg['Servers'][$i]['controlpass'] = 'strongpassword';
------
$cfg['Servers'][$i]['pmadb'] = 'phpmyadmin';
$cfg['Servers'][$i]['bookmarktable'] = 'pma__bookmark';
$cfg['Servers'][$i]['relation'] = 'pma__relation';
$cfg['Servers'][$i]['table_info'] = 'pma__table_info';
$cfg['Servers'][$i]['table_coords'] = 'pma__table_coords';
$cfg['Servers'][$i]['pdf_pages'] = 'pma__pdf_pages';
$cfg['Servers'][$i]['column_info'] = 'pma__column_info';
$cfg['Servers'][$i]['history'] = 'pma__history';
$cfg['Servers'][$i]['table_uiprefs'] = 'pma__table_uiprefs';
$cfg['Servers'][$i]['tracking'] = 'pma__tracking';
$cfg['Servers'][$i]['userconfig'] = 'pma__userconfig';
$cfg['Servers'][$i]['recent'] = 'pma__recent';
$cfg['Servers'][$i]['favorite'] = 'pma__favorite';
$cfg['Servers'][$i]['users'] = 'pma__users';
$cfg['Servers'][$i]['usergroups'] = 'pma__usergroups';
$cfg['Servers'][$i]['navigationhiding'] = 'pma__navigationhiding';
$cfg['Servers'][$i]['savedsearches'] = 'pma__savedsearches';
$cfg['Servers'][$i]['central_columns'] = 'pma__central_columns';
$cfg['Servers'][$i]['designer_settings'] = 'pma__designer_settings';
$cfg['Servers'][$i]['export_templates'] = 'pma__export_templates';
------

# Save and exit the editor
Now import the phpmyadmin database and create the tables as shown below.
sudo mysql < /usr/share/phpmyadmin/sql/create_tables.sql
# OR
sudo mysql -u root -p < /usr/share/phpmyadmin/sql/create_tables.sql
Also, create the user to access the phpmyadmin database as shown below.
# Login to MySQL

sudo mysql
# OR
mysql -u root -p

# Create Users - MySQL Native Password Plugin
mysql> CREATE USER 'phpmyadmin'@'localhost' IDENTIFIED WITH caching_sha2_password BY 'strongpassword';

# Grant privileges to the user
mysql> GRANT SELECT, INSERT, UPDATE, DELETE ON phpmyadmin.* TO 'phpmyadmin'@'localhost';

# Apply Changes
mysql> FLUSH PRIVILEGES;

# Exit MySQL
mysql> exit;
Database Users
We can log in to phpMyAdmin either using the root user of MySQL or by creating additional MySQL users with limited privileges. You may follow How To Install MySQL 8 on Ubuntu 20.04 LTS to update the root user.
The below mentioned commands can be used to add additional MySQL users. We can log in to phpMyAdmin using the MySQL users.
# Login to MySQL

sudo mysql
# OR
mysql -u root -p

# Create Users - MySQL Native Password Plugin
mysql> CREATE USER 'projecta'@'localhost' IDENTIFIED WITH mysql_native_password BY 'password';

# Create Users - MySQL Caching SHA2 Password Plugin - Preferred
mysql> CREATE USER 'projectb'@'localhost' IDENTIFIED WITH caching_sha2_password BY 'password';

# Exit MySQL
mysql> exit;
Now we can log in to the phpMyAdmin using the MySQL users. We can also create the databases and grant privileges to the MySQL users as shown below.
# Login to MySQL

sudo mysql
# OR
mysql -u root -p

# Create Database - with default character set
mysql> CREATE DATABASE projecta;

# Create Database - with utf8mb4 character set - preferred
mysql> CREATE DATABASE projectb CHARACTER SET utf8mb4 COLLATE utf8mb4_general_ci;

# Grant privileges to the users
mysql> GRANT ALL PRIVILEGES ON projecta.* TO 'projecta'@'localhost';
mysql> GRANT ALL PRIVILEGES ON projectb.* TO 'projectb'@'localhost';

# Apply Changes
mysql> FLUSH PRIVILEGES;

# Exit MySQL
mysql> exit;
Secure phpMyAdmin - Basic Authentication
The previous sections explained all the steps required to install phpMyAdmin. This section provides the steps to secure the phpMyAdmin installation using the in-built security feature of Apache Web Server i.e. Basic Authentication. After enabling the Basic Authentication, the browser will prompt for username and password to access the phpMyAdmin web interface. We can enable the Basic Authentication as shown below.
# Configure htaccess of phpMyAdmin
sudo nano /usr/share/phpmyadmin/.htaccess

# Content
AuthType Basic
AuthName "Restricted"
AuthUserFile /etc/phpmyadmin/.htpasswd
Require valid-user

# Save and exit the editor
The .htaccess file makes sure that the web interface of phpMyAdmin is accessible only if the valid username and password are specified in the AuthUserFile i.e. .htpasswd file. We can add username and password to the .htpasswd as shown below.
# Make directory
sudo mkdir -p /etc/phpmyadmin

# Generate Username Password pair
sudo htpasswd -c /etc/phpmyadmin/.htpasswd username

# Output
New password:
Re-type new password:
Adding password for user username
We can add more users to the htpasswd file without using the -c argument. Now if we try to access phpMyAdmin, it will show a prompt asking for username and password as shown in Fig 17.
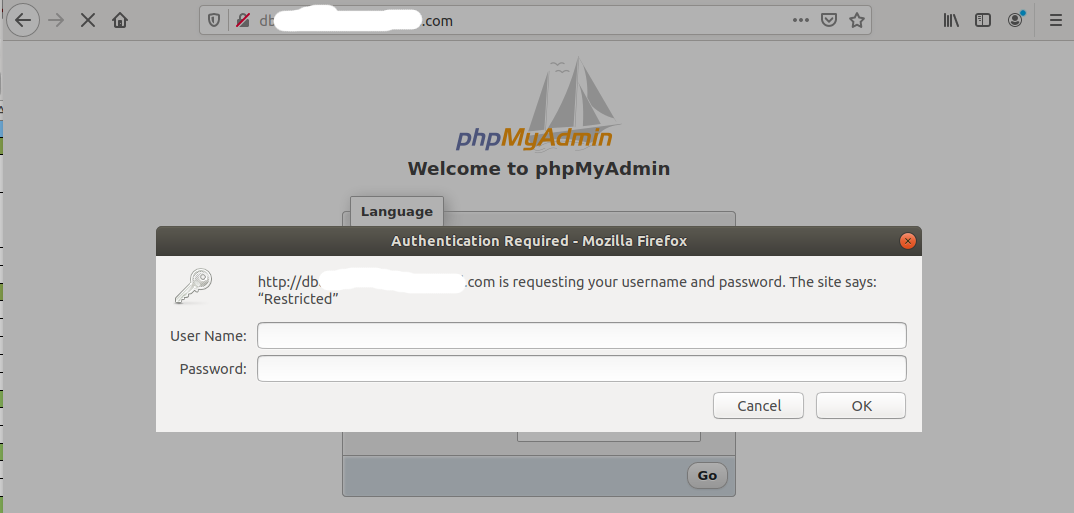
Fig 17
Secure phpMyAdmin - SSL Encryption
In the previous sections, we have discussed to install phpMyAdmin and secure it using the Basic Authentication. We can further tighten the security by adding SSL/TLS encryption using the HTTPS protocol and the SSL certificate. This section provides the details to force strict HTTPS communication using the free SSL certificate provided by Let's Encrypt. We can generate the SSL certificate to secure phpMyAdmin as shown below.
# Install Certbot for Apache
sudo apt-get install python3-certbot-apache

# Generate SSL Certificate
sudo letsencrypt --apache -d mydb.myserverdomain.com --email myemail@myserverdomain.com

# Output
------
- - - - - - - - - - - - - - - - - - - - - - - - - - - - - - - - - - - - - - - -
Please read the Terms of Service at
------
- - - - - - - - - - - - - - - - - - - - - - - - - - - - - - - - - - - - - - - -
(A)gree/(C)ancel: A

- - - - - - - - - - - - - - - - - - - - - - - - - - - - - - - - - - - - - - - -
Would you be willing to share your email address with the Electronic Frontier
------
- - - - - - - - - - - - - - - - - - - - - - - - - - - - - - - - - - - - - - - -
(Y)es/(N)o: Y
------
------
Please choose whether or not to redirect HTTP traffic to HTTPS, removing HTTP access.
- - - - - - - - - - - - - - - - - - - - - - - - - - - - - - - - - - - - - - - -
1: No redirect - Make no further changes to the webserver configuration.
2: Redirect - Make all requests redirect to secure HTTPS access. Choose this for
new sites, or if you're confident your site works on HTTPS. You can undo this
change by editing your web server's configuration.
- - - - - - - - - - - - - - - - - - - - - - - - - - - - - - - - - - - - - - - -
Select the appropriate number [1-2] then [enter] (press 'c' to cancel): 2
------
------
- - - - - - - - - - - - - - - - - - - - - - - - - - - - - - - - - - - - - - - -
Congratulations! You have successfully enabled https://mydb.myserverdomain.com

You should test your configuration at:
https://www.ssllabs.com/ssltest/analyze.html?d=mydb.myserverdomain.com
- - - - - - - - - - - - - - - - - - - - - - - - - - - - - - - - - - - - - - - -

IMPORTANT NOTES:
 - Congratulations! Your certificate and chain have been saved at:
   /etc/letsencrypt/live/mydb.myserverdomain.com/fullchain.pem
   Your key file has been saved at:
   /etc/letsencrypt/live/mydb.myserverdomain.com/privkey.pem
   Your cert will expire on 2020-09-12. To obtain a new or tweaked
   version of this certificate in the future, simply run certbot again
   with the "certonly" option. To non-interactively renew *all* of
   your certificates, run "certbot renew"
 - If you like Certbot, please consider supporting our work by:

   Donating to ISRG / Let's Encrypt:   https://letsencrypt.org/donate
   Donating to EFF:                    https://eff.org/donate-le
This completes the installation of the SSL certificate from Let's Encrypt and also ensures that all the communication is done over the HTTPS protocol.
Login
Now login to the phpMyAdmin using the MySQL users. The dashboard of the phpmyadmin user and the database tables of the phpmyadmin database should be similar to Fig 18 and Fig 19.
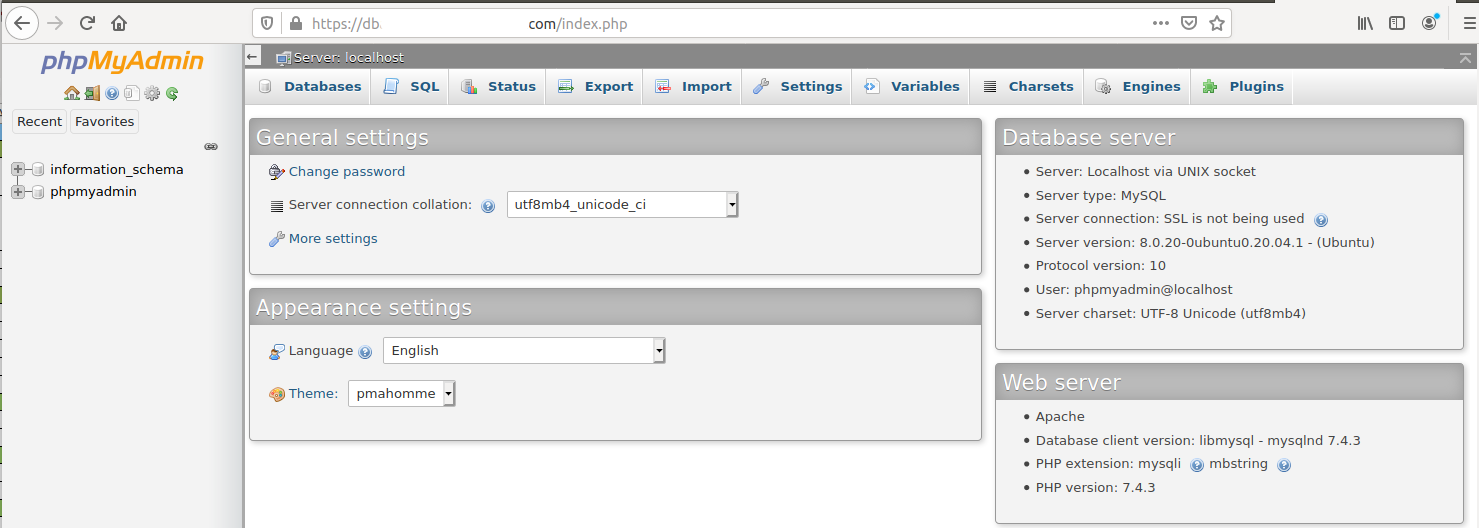
Fig 18
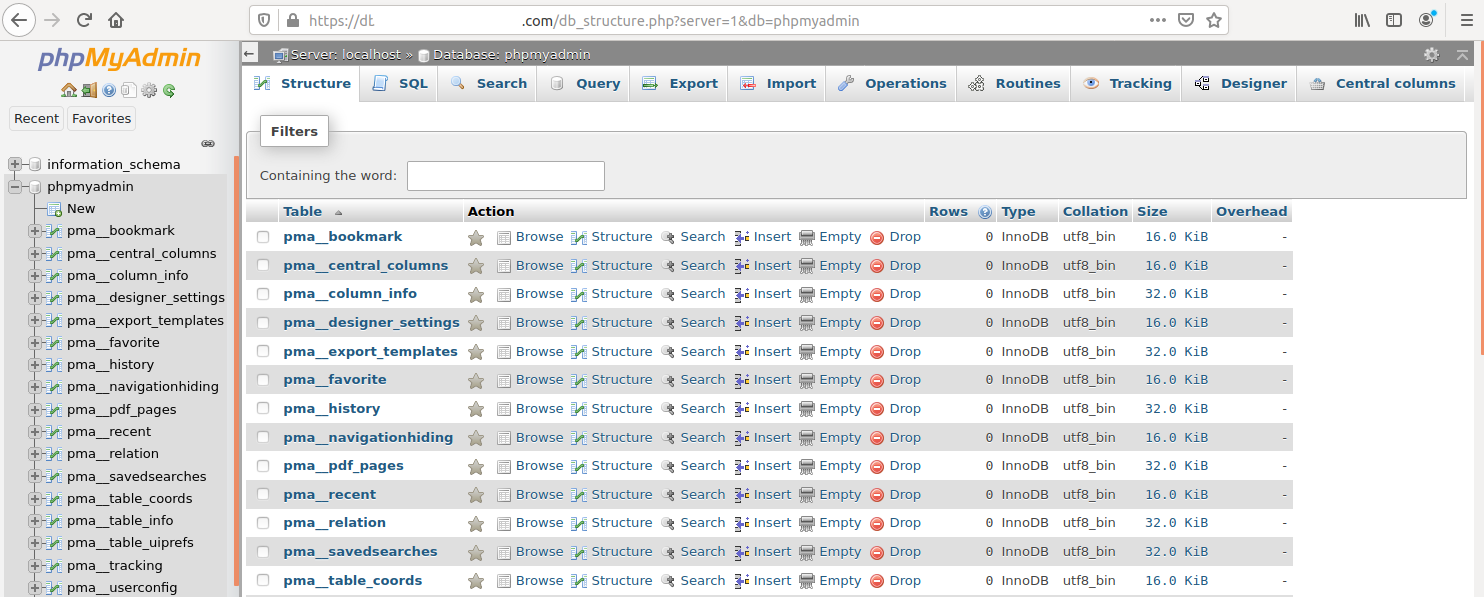
Fig 19
Summary
This guide provided the steps required to install phpMyAdmin on Ubuntu 20.04 LTS. It also showed how to configure it for the Apache Web Server and secure it using the Let's Encrypt SSL certificate.


